For those who program on Arduino, sooner or later the desire comes to take the assembly outside of the Arduino card for reasons of consumption, space or cost. Many tips and tutorials exist and after having tried my hand at it, one more will not be too much, especially if you too have not really understood this story of internal clock and external oscillator…
From the beginning
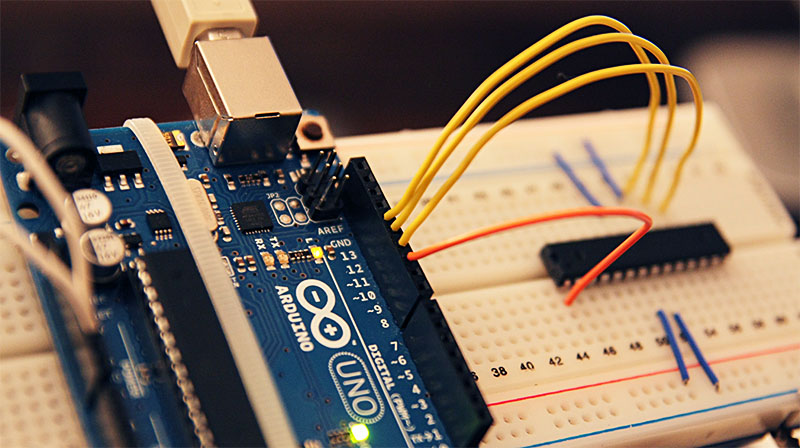
As a reminder, the ATMEGA328P-PU is the chip at the heart of the Arduino UNO in particular (framed in red in the image below, we can see the notch to the right of the chip to orient it correctly). It can be easily found on merchant sites and cheaper on EBay. Once received, it is free of any data, program or bootloader. The bootloader (or initialization sequence) is a small piece of code that will allow the Arduino to communicate with the outside world and therefore load its own programs. It will also be used to initialize and launch the program that has been loaded. Functionally, it can be compared to a computer’s BIOS.

We must therefore burn this sequence to be able to use the ATMEGA. But one last choice remains to be made. The Arduino uses an ATMEGA chip clocked at 16MHz, which requires an external oscillator and some components present on the UNO board. The ATMEGA also has a clock clocked at 8MHz (datasheet on the Atmel website). We must therefore choose how often we want to use the ATMEGA before burning the bootloader. For simple applications, 8MHz is more than sufficient, and the advantage is that burning the sequence does not require any other component other than an Arduino card. We therefore choose this solution. But for those who would still like to burn a 16Mhz bootloader in the same way, I suggest they take a look at the last part…
Step by step
1 – Use the Arduino as an ISP (In System Programmer)
We load a particular program into the Arduino so that it becomes the interface capable of engraving our ATMEGA. Connected via USB, we load the ArduinoISP example program. In version 04m3, we do not modify it, despite what we can read elsewhere.

2 – Load new hardware into the Arduino IDE
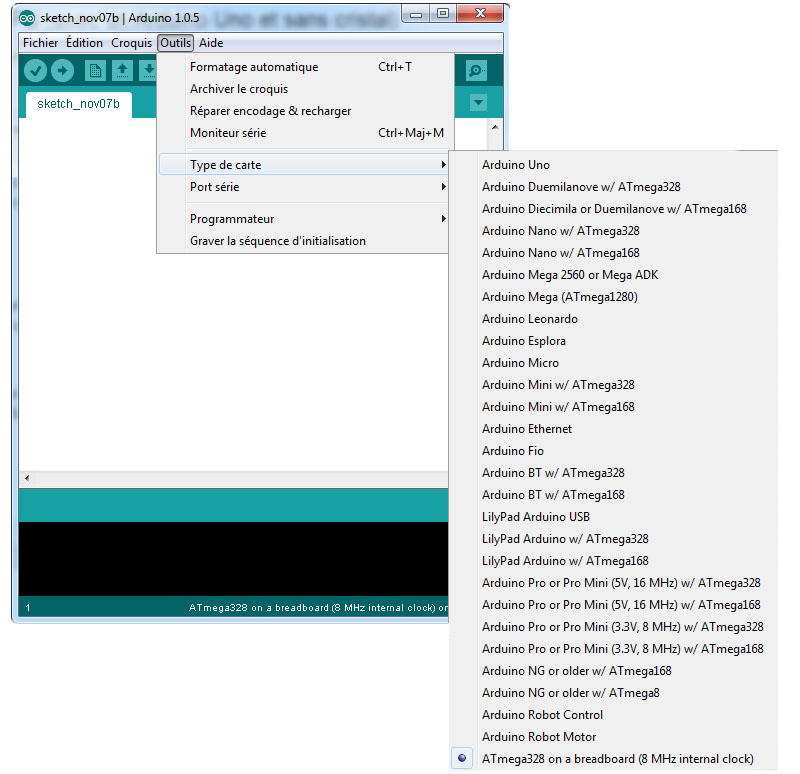
Standalone ATMEGA hardware is not listed by default in the card types (Tools menu). We add it by creating the hardware/breadboard folders in the “sketchbook” folder. And in this last folder, we copy/paste the boards.txt file. We restart the IDE which now offers the hardware “ATMEGA328 on a breadboard (8MHz internal clock)” which we select.
3 – Create the circuit
We connect the ATMEGA to the Arduino in the following way
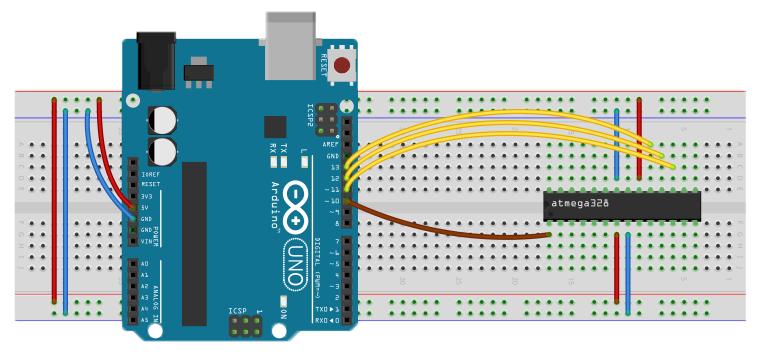
4 – Burn the bootloader
After choosing Tools/Programmer/Arduino as ISP, we are ready to burn the bootloader. The operation is carried out in a few tens of seconds.

And there you have it, we have an ATMEGA ready to receive programs with the aim of being used alone in a circuit without the UNO card!
Troubleshooting
And there you have it, you have unfortunately tried to burn a 16MHz bootloader on your poor ATMEGA according to the diagram above (by choosing an option other than ATMEGA328 on a breadboard (8MHz internal clock)). And now any new attempt results in:
avrdude: Device signature = 0x000000
avrdude: Yikes! Invalid device signature.
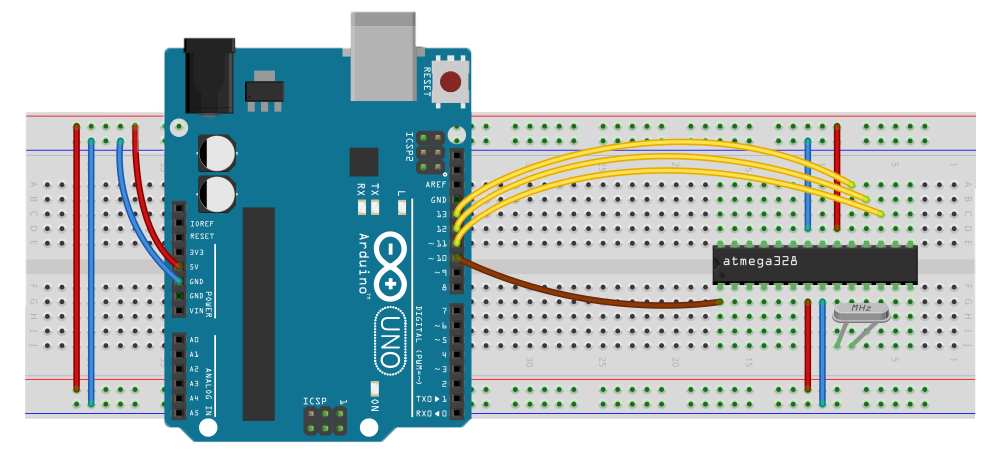
A little explanation: certain ATMEGA settings are established via fuses. Your last attempt set the fuse corresponding to “external clock to 16Mhz” and failed to burn the bootloader. But this first setting remains and any new attempt to communicate with it at 8Mhz does not work. It is therefore necessary to adjust the fuse again and for this, we use a 16MHz oscillator on pins 9 and 10 of the ATMEGA. For troubleshooting, a single oscillator can operate (without capacitors) according to the following diagram. Then we restart writing the bootloader corresponding to the option ATMEGA328 on a breadboard (8MHz internal clock) which is written on the ATMEGA correctly. That’s how I convinced myself, in any case, it works!
To go further
Additional information can be found here:
http://arduino.cc/en/Main/Standalone
http://arduino.cc/en/Tutorial/ArduinoToBreadboard
